Eating fresh bread, still
slightly warm from the oven, with a generous dollop of butter, first thing in
the morning. Sheer ecstasy! The house smells heavenly….. warm and
very very inviting. Don’t blame me, I am warning you in advance, you are
going to get a lot of unexpected visitors as your bread bakes in the oven.
There is something almost magnetic about the aroma of freshly baking bread.

Each time I bake bread, it strengthens my resolve, never to put bread in my shopping cart. The homemade ones are so fresh and there are absolutely no preservatives, its sheer goodness ! These cloverleaf rolls are soft and have this nuttiness from the whole wheat and is good to eat even without any accompaniment. And they look so pretty.

Bread baking uses the most basic ingredients, it is a very satisfying experience, kneading the dough and then watching it swell up and being baked to golden perfection. I marvel at the process each time I bake bread. A lot of people I know shy away from it, they are not comfortable handling yeast.

Think of yeast as a living organism which has to be handled with care. To activate the yeast we put it in warm water and provide it with food, which is sugar. Whenever activating yeast ensure that the water is never too hot, it should just be warm enough, it should feel comfortable on our skin.

These rolls taste best on the day they are baked. Though they will last for 2-3 days, if stored well. However, slightly warming them in the microwave or the oven will freshen them up greatly.


The recipe below yields 10 rolls, though when i actually started putting them in the cupcake tray I only had 9 left....only to discover that one portion had been sneaked out and put to a more creative use!
Wholewheat Cloverleaf Rolls
125 gms All purpose flour/ Maida
125 gms Whole wheat flour
10 gms Butter
10 gms Sugar
10 gms Fresh Yeast or or 1 tsp instant yeast
3 gms Salt
165 ml Water (Approx.)

1. In a small bowl add half a cup warm water. Dissolve sugar and fresh yeast in the water. Cover and leave it aside for the yeast to activate, the mixture starts bubbling and will get frothy, takes about 5-10 mins.
If this doesn't happen then either the yeast is too old and you need fresh yeast or the water was either too hot or too cold.
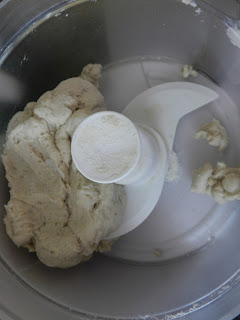
2. In the bowl of a food processor, using the dough attachment, add both the flours, butter, salt and the activated yeast and gradually add water. As you pulse the mixture it will all start coming together. The dough should be soft and not stiff.
Or
Put both the flours in a mixing bowl add the activated yeast mixture and the remaining water, gradually. Mix using a wooden spoon or your hands, till it all comes together. Then add the butter and salt. Mix.
3. Get the dough out on a work surface to knead with your hands.

Note: The dough might be a little sticky at this stage, do not add any more flour to the dough, it will result in a heavier texture. Instead grease your hand and the work surface a little and start kneading.
4. The correct way to knead is by putting it on the work surface and with the heels of the hands stretching the dough out and then folding it back and giving it a quarter turn.
5. Knead the dough till its smooth and elastic. Should take about 8-10 minutes. Round up the dough in a smooth ball, pushing the creases down.

6. Put the dough in a big bowl and cover with cling film or a damp kitchen towel and leave it till it doubles in size.

7. Once the dough doubles, gently punch it down to take the air out and cut out 10 equal portions of the dough. And keep them under a damp kitchen towel. This is to prevent the formation of a crust over the dough and to keep it soft.

8. Take out one portion at a time and divide it into 3 equal parts.


9. Now roll each small part into a small ball, ensuring to keep the tops smooth and pinching down the creases at the bottom.


10. In a lightly greased cupcake tray arrange the 3 balls of dough as seen in the picture.


11. Cover and leave the trays till it doubles in size. This should take roughly 30 mins. Also, preheat your oven 230 ° C.

12. Bake the rolls at 230°C for about 10-12 mins.
13. Once they are done, take the trays out of the oven and immediately brush the tops with some melted butter.

14. Let them cool on a wire rack.

15. Serve with some butter, soup or they are good to eat on their own too.
10 gms Fresh Yeast or or 1 tsp instant yeast
3 gms Salt
165 ml Water (Approx.)

1. In a small bowl add half a cup warm water. Dissolve sugar and fresh yeast in the water. Cover and leave it aside for the yeast to activate, the mixture starts bubbling and will get frothy, takes about 5-10 mins.
If this doesn't happen then either the yeast is too old and you need fresh yeast or the water was either too hot or too cold.
(Note: if using instant yeast directly add to the flour mix and knead)
2. In the bowl of a food processor, using the dough attachment, add both the flours, butter, salt and the activated yeast and gradually add water. As you pulse the mixture it will all start coming together. The dough should be soft and not stiff.
Or
Put both the flours in a mixing bowl add the activated yeast mixture and the remaining water, gradually. Mix using a wooden spoon or your hands, till it all comes together. Then add the butter and salt. Mix.

3. Get the dough out on a work surface to knead with your hands.

Note: The dough might be a little sticky at this stage, do not add any more flour to the dough, it will result in a heavier texture. Instead grease your hand and the work surface a little and start kneading.
4. The correct way to knead is by putting it on the work surface and with the heels of the hands stretching the dough out and then folding it back and giving it a quarter turn.
5. Knead the dough till its smooth and elastic. Should take about 8-10 minutes. Round up the dough in a smooth ball, pushing the creases down.

6. Put the dough in a big bowl and cover with cling film or a damp kitchen towel and leave it till it doubles in size.

7. Once the dough doubles, gently punch it down to take the air out and cut out 10 equal portions of the dough. And keep them under a damp kitchen towel. This is to prevent the formation of a crust over the dough and to keep it soft.

8. Take out one portion at a time and divide it into 3 equal parts.


9. Now roll each small part into a small ball, ensuring to keep the tops smooth and pinching down the creases at the bottom.


10. In a lightly greased cupcake tray arrange the 3 balls of dough as seen in the picture.


12. Bake the rolls at 230°C for about 10-12 mins.
13. Once they are done, take the trays out of the oven and immediately brush the tops with some melted butter.

14. Let them cool on a wire rack.

No comments:
Post a Comment