Friday, 18 October 2013

Homemade Peanut Butter

 
Chances are that if you like peanut butter, you love it and, if you don't, well, you just don't. I have been making my own peanut butter for quite some time now. Once you start making it at home there is no way you will be able to buy a bottle off the shelf. They suddenly seem so, 'preserved'.


Making your own peanut butter is not only healthier but there is a lot of variation that you can do to suit your personal taste. You like it sweeter, add more honey, you want it little salty, add in a good pinch of salt, you like it chunky, add in roasted peanuts, or if, creamy, just whizz the whole thing to creamy goodness.  You could even try a new flavour, like maybe vanilla or coffee or chocolate. 


The best part, just 4 ingredients and a food processor, and you are done.
 
 
Added some chocochips to half the quantity and boy, I am so glad I did.....mmmm...yum yum yum!


Peanut Butter
 
Roasted & skinned peanuts                 1 1/2 cups
Extra virgin olive oil or any other oil   1 Tbsp
Honey                                                as per taste
Salt                                                    as per taste
 
 
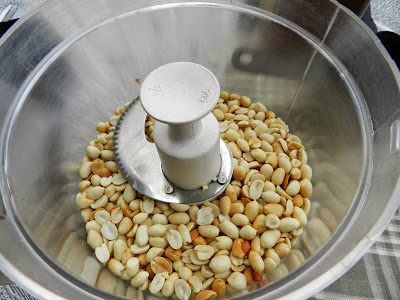
1. Put all the peanuts in the bowl of the food processor and whizz till it resembles a coarse powder.


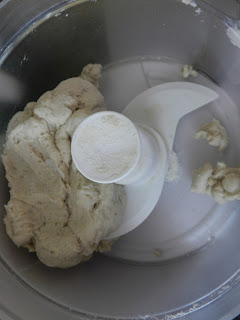
2. Pulse on till it all starts coming together...check out the stages in the pics below. Remember to keep scrapping the sides, of the bowl.


3. And then it starts liquidising... at this stage put in your oil and honey and salt and whizz it more.


4. Finally, it starts thinning out and you have creamy, delicious peanut butter.


5. For chocolate peanut butter, once you have reached this stage, just add in choco chips and continue to process it.


Sunday, 13 October 2013

Naan Khataai


“I just figured if I was going to make the world a better place, I’d do it with cookies.”

                                                                                                               Stranger Than Fiction
 
 
I love home baked cookies, eating something that is still warm from the oven is my idea of indulgence. Unfortunately, my oven had developed a mind of its own and had started acting little strange, heating up too fast at times and just refusing to fire up on endless occasions. Finally, managed to get my poor Mr. O, serviced and after what seems like decades we are back together, like good old times. 
 
 
What better way to celebrate than bake a batch of cookies and keeping up with the festive season, it only seemed right to bake Naan Khataai.  The recipe below is so simple and yields such amazing results that even a child can bake these.


Ghee, cardamom, pistachios, flour & sugar. Really, what can go wrong here? It’s all truly amazing stuff put in a bowl, kneaded together, baked to perfection and then, polished off.


Depending on your personal taste and flavour, you could substitute almonds with pistachios. I baked a batch with pistachios, as, that is what I found in the kitchen cabinet.
Right before popping the cookies in the oven


Naan Khatai

 
Maida or All purpose flour - 1 cup
Ground sugar - 10 tbsp ground sugar
Baking soda -  3/4 tsp
 
Cardamom powder - ½ tsp

Ghee - 6-8 tbsp.
Almonds or pistachios, chopped - ¼ Cup

Ready to be baked
 
1. Preheat the oven to 180 C
 
2. Sieve the AP flour and the baking soda.
 
3. Add all the other ingredients, except ghee and mix well.
 
4. Gradually add the ghee and knead the dough till it all comes together. Don't overwork the dough.
 
5. Divide the dough into 12 equal portions.
 
6. Roll each portion into a smooth ball and flatten slightly between the palms. Place on a lined baking tray. Garnish the tops with a few chopped pistachios.
 
7. Bake in preheated oven for 15 mins.
 
8. Remove from the oven, cool them completely and store in an airtight container.
 

Monday, 20 May 2013

Amla Pickle


“Cooking is not about being the best or most perfect cook, but rather it is about sharing the table with family and friends.”  ~ Skye Gyngell


I have recently returned from a nice long stay at my parent's. Like most people, I am convinced that my mother is absolutely the best cook in the whole world. For over a month I was ‘living to eat’...…eating one meal and looking forward to the next one.


This amla pickle that she made, was among the first things that I tried during my stay. According to me, this is how food should be, no complex procedure or ingredients. This is a simple,  home style pickle, using the most basic ingredients that are a part of most kitchens. 


Incidentally, on my way back home, I came across an article in the in-flight magazine of my chosen air carrier. It was an extensive two page article on the goodness of amlas, talking about how amlas are a storehouse of Vitamin C and are loaded with anti-oxidants. It was so convincingly written that i knew i had to pickle my very own gooseberries, at the earliest. It almost seemed like a divine signal, urging me to get down to making my own 'amle ka achaar' and here it is .....


Amla Pickle

300 gms                 Amlas or gooseberries
2 Tbsp                   Mustard Oil
1 tsp                      Haldi/Turmeric
1 tsp                      Red chilli powder
1.5 tsp                   Ajwain/ Carom seeds
1 Tbsp                   Vinegar
1.5 tsp                   Salt

1. Wash the amlas well and boil them in water till they are fork tender. Take them out of the water and keep.
                                               or 
Put them in a pressure cooker with a little water and give it one whistle. After the whistle immediately drop the pressure by putting the cooker under running water.

2. In a wok or kadhai add mustard oil. Once the oil is heated up add turmeric, ajwain, chilli powder and salt.


Add caption


3. Add the cooked amlas and mix till the masala coats the amlas.


4. Finally add the vinegar and mix.


5. Let the pickle cool completely and then store in an airtight container. 


Thursday, 11 April 2013

Sweet potato knots

“The only real stumbling block is fear of failure. In cooking you’ve got to have a what-the-hell attitude.” ~ Julia Child


There are certain recipes that sound very promising, but somehow are never tried. These sweet potato rolls were one such recipe. It was given by a friend ages ago and was told it’s a must try, but I completely forgot about it. I recently stumbled upon it in my old recipe journal; a torn and frayed little piece of paper with a note scribbled on top of the paper- must try. 


Sweet potatoes are one of the richest sources of Vitamin A and this was such a novel use of the humble root. Luckily, I had some fresh yeast lying in the fridge begging to be used before it got spoilt. I am so glad I tried these, straight out of the oven they were a treat…..soft, slightly sweet, buttery and absolutely mouth watering.


These knots have a bare hint of sweetness in them. You can’t really taste the sweet potatoes but they have a slight yellowish – orange color owing to the root. Perfect with a cup of tea or coffee.


Sweet Potato Knots

2 tsp         Fresh yeast
½ C          Warm water
1 C           Boiled and mashed sweet potatoes
¼ C          Sugar
¼ C          Butter at room temp
1              Egg white or 1/2 slightly beaten egg
¾ tsp       Salt
3 – 3 ½ C  Flour


1. In a small bowl add warm water, some sugar and the yeast. Mix well and let it stand for 5-10 mins or till the mixture is frothy.


2. In another bowl mix together, mashed sweet potatoes, 3 cups flour, remaining sugar,  butter, egg, salt and the yeast mixture. Mix using a wooden spoon till it all comes together.


3. Bring it out on the work surface and using the heels of your hands stretch the dough and then fold it back and give it a quarter turn. The dough will be slightly sticky at this point but will eventually turn out fine.

You could add a little flour to the dough if its too sticky or simply grease your palms and the work surface. Knead for 8- 10 mins. 


4. Gather the dough together to form a smooth ball. Put it in a bowl and leave it covered with a damp kitchen towel or a cling film till it doubles in size.


5. Once doubled, gently punch the dough down out and divide it in 12-14 equal portions.


6. Shape each portion into a knot. Cover with a damp kitchen towel and leave on a lightly greased baking tray to rise till doubled.


7. Bake at 190 C for 12-14 mins.


 8. Bring the rolls out of the oven and brush with some melted butter. 

Wednesday, 27 March 2013

Saffron & Pistachio Kulfi

“If more of us valued food and cheer and song above hoarded gold, it would be a merrier world.” ~ J.R.R. Tolkien


My curious 5 yr old came back from the school yesterday afternoon with a beautiful handmade card that very lovingly said ‘Dear Mom and Dad………Happy Holi’. I found it adorable and before I could even sit down and decide where to display his work of art, (I know, I am a hopelessly obsessed mother) I was bombarded with a series a question….Why do we celebrate holi? Why do we put colors on everyone? Which God do we pray to in holi? Will we have to go to the temple tomorrow to ‘do holi’? And it continued....each answer leading to more questions and so it went on for a while.


I was not too sure of the answers myself, and told him was that Holi is a festival that helps us make friends and strengthen our bond with our loved ones.  But I guess he did not find the answer interesting enough and with a distracted look walked out on our little Q & A session. 


Holi, I feel is that one day where you can drop all inhibitions and just have fun; you can look and behave ridiculous, its all acceptable. There are no rituals to follow, no customs to adhere to, basically it’s all about having a good time...……..its a festival that celebrates the free spirit in all of us, you can just be yourself. No pretenses, whatsoever.


To sweeten the festival of colors .....here is some refreshing and calorie laden kulfi, studded with pistachios and that delicate flavor of saffron.


Happy holi people :)

Saffron and Pistachio Kulfi

500 ml                    Milk
250 gms                  Condensed milk
2 Tbsp                    Milk powder
1 Tbsp                    Cornflour
3-4 Tbsp                 Roasted pistachio (chopped )
a few strands          Saffron


!. In a heavy bottom pan, combine milk, milk powder, cornflour and condensed milk. Stir well to ensure no lumps are formed.

2. Bring to a boil stirring continuously.

3. Simmer and cook for 15- 20 mins, stirring continuously, till the mixture slightly thickens. Take it off the flame.

4. Add chopped pistachios and saffron strands.


5. Cool the kulfi mixture and fill up small earthen ware containers or kulfi moulds.


6. Wrap with cling film.


7. Freeze them overnight.


Saturday, 23 March 2013

Wholewheat Cloverleaf Rolls

“Good bread is the most fundamentally satisfying of all foods; and good bread with fresh butter, the greatest of feasts.” – James Beard


Eating fresh bread, still slightly warm from the oven, with a generous dollop of butter, first thing in the morning. Sheer ecstasy! The house smells heavenly….. warm and very very inviting. Don’t blame me, I am warning you in advance, you are going to get a lot of unexpected visitors as your bread bakes in the oven. There is something almost magnetic about the aroma of freshly baking bread.


Each time I bake bread, it strengthens my resolve, never to put bread in my shopping cart. The homemade ones are so fresh and there are absolutely no preservatives, its sheer goodness ! These cloverleaf rolls are soft and have this nuttiness from the whole wheat and is good to eat even without any accompaniment. And they look so pretty.


Bread baking uses the most basic ingredients, it is a very satisfying experience, kneading the dough and then watching it swell up and being baked to golden perfection. I marvel at the process each time I bake bread.  A lot of people I know shy away from it, they are not comfortable handling yeast. 


Think of yeast as a living organism which has to be handled with care. To activate the yeast we put it in warm water and provide it with food, which is sugar. Whenever activating yeast ensure that the water is never too hot, it should just be warm enough, it should feel comfortable on our skin.


A lot of bread recipes call for the addition of yeast directly to the dough mixture. But if you are using Active dry yeast or fresh yeast, activate the yeast separately and then add to the flour.  One, fermenting it separately ensures it is dissolved well and is mixed evenly with the dough.  Two, you always know if the yeast is still active and good to use, beforehand and you can save yourself a lot of heartache, energy and ingredients.


These rolls taste best on the day they are baked. Though they will last for 2-3 days, if stored well. However, slightly warming them in the microwave or the oven will freshen them up greatly.


The recipe below yields 10 rolls, though when i actually started putting them in the cupcake tray I only had 9 left....only to discover that one portion had been sneaked out and put to a more creative use! 


Wholewheat Cloverleaf Rolls 

125 gms                      All purpose flour/ Maida
125 gms                      Whole wheat flour
10 gms                        Butter
10 gms                        Sugar
10 gms                        Fresh Yeast  or or 1 tsp instant yeast 
3 gms                          Salt
165 ml                        Water (Approx.)


1. In a small bowl add half a cup warm water. Dissolve sugar and fresh yeast in the water. Cover and leave it aside for the yeast to activate, the mixture starts bubbling and will get frothy, takes about 5-10 mins. 

If this doesn't happen then either the yeast is too old and you need fresh yeast or the water was either too hot or too cold.

(Note: if using instant yeast directly add to the flour mix and knead)


2. In the bowl of a food processor, using the dough attachment, add both the flours, butter, salt and the activated yeast and gradually add water. As you pulse the mixture it will all start coming together. The dough should be soft and not stiff. 

Or 

Put both the flours in a mixing bowl add the activated yeast mixture and the remaining water, gradually. Mix using a wooden spoon or your hands, till it all comes together. Then add the butter and salt. Mix.


3. Get the dough out on a work surface to knead with your hands.


Note: The dough might be a little sticky at this stage, do not add any more flour to the dough, it will result in a heavier texture. Instead grease your hand and the work surface a little and start kneading.


4. The correct way to knead is by putting it on the work surface and with the heels of the hands stretching the dough out and then folding it back and giving it a quarter turn.  


5. Knead the dough till its smooth and elastic. Should take about 8-10 minutes. Round up  the dough in a smooth ball, pushing the creases down.


6. Put the dough in a big bowl and cover with cling film or a damp kitchen towel and leave it till it doubles in size. 


7. Once the dough doubles, gently punch it down to take the air out and cut out 10 equal portions of the dough. And keep them under a damp kitchen towel. This is to prevent the formation of a crust over the dough and to keep it soft. 


8. Take out one portion at a time and divide it into 3 equal parts. 


9. Now roll each small part into a small ball, ensuring to keep the tops smooth and pinching down the creases at the bottom.


10. In a lightly greased cupcake tray arrange the 3 balls of dough as seen in the picture.


11. Cover and leave the trays till it doubles in size. This should take roughly 30 mins. Also, preheat your oven 230 ° C.


12. Bake the rolls at 230°C for about 10-12 mins.  


13. Once they are done, take the trays out of the oven and immediately brush the tops with some melted butter. 


14. Let them cool on a wire rack.


15. Serve with some butter, soup or they are good to eat on their own too.